Blog

Guest Blog - ‘Uncovering’
Hindu monastic and founder of The Traditional Yoga Association, Swami Ambikananda shares her creative journey, accompanied with her insights of art as a form of meditation. Beginning with drawing portraits at school, through to learning oil painting in her 70's.
Hindu monastic and founder of The Traditional Yoga Association, Swami Ambikananda shares her creative journey, accompanied with her insights on art as a form of meditation. Beginning with drawing portraits at school, through to learning oil painting in her 70's.

Written by, Swami Ambikananda, August 2024.
Drawing: Swami Ambikananda, Laura Truesdale, 2021, Graphite & Chalk on Recycled Paper.
Uncovering
“It is not art in the professionalized sense about which I care, but that which is created sacredly, as a result of a deep inner experience, with all of oneself, and that becomes ‘art’ in time.”
-Alfred Stieglitz
Art was not a primary topic in the house I grew up in, so I was in my early teens before I discovered the work of Mary Cassatt, the late 18th - early 19th century artist. A woman who could paint!
Until that moment, to my teenage mind, art was for eccentric middle-class men born in or near the Left Bank ~ or with aspirations to live there. It was a discovery that got me visiting our local art gallery in Johannesburg at least once a week to study pieces of art. I remember still a Gaudi, with its thickly applied paint and astonishing colours ~ almost creating a 3D effect on a flat canvas.
I had played with my pencils and found I could ~ well, sort of ~ reproduce on paper what I was looking at. I remember well that I enjoyed drawing trees and my pet chameleon more than anything else. Delightfully, it was a skill that allowed me to earn 50 cents a portrait from my school friends.
Then I grew up and entered the corporate world and before I knew it, I was bringing up children. My art books were shelved and didn’t emerge again till my children’s teen years when I tentatively started to put pencil to paper again.
I only started using my completely untrained skills again when, much later, I started teaching Yoga and needed to illustrate certain postures and teachings ~ but always with pencil and paper.

Tina, Swami Ambikananda, Oil Pastel on Paper.
Then Laura came into my life and started her art school. Oils! She was teaching an oil portraiture class and here I was, in my seventies, thinking of doing it. Of course I had tried oils before ~ disastrously! Brushes just didn’t do what pencils did and the paint… oh! heavens… that paint that took forever to dry! I had already decided by the time I reached my mid-sixties that I didn’t have time before I died to wait for its drying process.
But there I was, on the course, and the first lesson was great: how to block off the image on paper so as to reproduce it yourself on another surface. It was a revelation. I knew immediately this was going to save me many frustrating hours of rubbing out and re-doing. Then we moved on to applying the actual oils. So, there I was, sitting on the floor applying this slippery substance to a rough canvas using a brush that seemed to have a mind of its own, trying to recreate an image. In the midst of the thought, “Oh God, this is impossible!” something magical happened.

Maggie, Swami Ambikananda, Oil Pastel on Paper
My spiritual life ~ the life of the unmeasured, immeasurable self, has been an inner search since I could remember. I love science and my respect for it has grown as I have. However, the limited vision of those who would reduce life to an accident in a mechanistic, meaningless universe, in which only the measurable has reality, never sat well with me. One does not have to reach my old age to realise that not everything in our universe can be controlled and predicted as the reductionist approach asks us to believe. So that search for the immeasurable had become my primary focus.
As Laura was talking us through the application of the paint her voice calm, but insistent, had my mind and hand trying ~ largely unsuccessfully ~ to work together, when, suddenly, everything went quiet. A coherence overtook me ~ mind, body and breath all became engaged in the same thing, and a deeply meditative state took over for most of that class. Her voice and instructions did not disrupt that process ~ it deepened it through the lesson. Oil painting had become Yoga.
The primary definition of Yoga was given to us by the philosopher and sage Patanjali, and dates back to about 250 BCE:
‘Yoga is the stilling of the movement of thought in consciousness. Then we know our true reality. At all other times, we identify with a passing thought.’1
In that ‘stilling of the movement of thought’ one finds oneself in a space, in a state of consciousness, that is both immeasurable and indescribable. As the flow of thought ceases, one finds oneself going in a single direction as a different and deeper reality begins to reveal itself.

Clair Louisa, Swami Ambikananda, Oil Pastel on Paper.
In the days that followed I finished the portrait Laura had set us as a task for the course, and even liked the end result. I would love to be able to show it here, but I threw it away ~ as I’ve said: I’m old and have to clear things out.
But it opened a new door for me in my relationship with art. It became part of that search for a deeper and truer reality, part of my Yoga practice, rather than simply a means to an end.
I have done a few portraits again since the course ~ of my spiritual teacher, Swami Venkatesananda, of my favourite singer, Tina Turner, of Maggie Aderin Pocock (an astrophysicist whose deliciously humorous approach always delights me). I didn’t do them in oils ~ I went to oil pastels, but Laura had given me the courage to work in colour!
Gradually, I got up the nerve to try the portrait of a friend, Clair Louisa. Something ‘in real life’ if you like. She is a witty, insightful woman and all of that needed to be reflected on paper. I have completed the oil pastels portrait of her ~ next comes the oils! Will let you know how that goes.
And yes, I am definitely going to demand the 50p from her when it’s finished!
Swami Ambikananda
Reference
1. Patajali Yoga Sutras, verses 2, 3 and 4
Swami Ambikananda
You can find information on The Traditional Yoga Association and Swami Ambikananda by clicking: here
Swami Ambikananda is also the founder of homeless & education charity, MUKTI. For more information, or to take part in their fundraising raffle, click: here

Guest Blog - ‘A Significant Transformation’
Thinking of taking the leap and becoming a painter? Artist and former Brushstrokes Courses’ student, Bill Greenhead shares his journey from digital artist to professional painter, following on from our 2022 Introduction to Oil Paint Course.
Artist and Brushstrokes Alumni, Bill Greenhead shares his experience on his creative journey from Digital Artist to exhibiting Oil Painter following the Beginners Oil Painting Course in 2022.

Written By: Bill Greenhead, May 2024.

I have been a professional illustrator since I was 21 years old, and I continue to work in the field. Now, at 58, my art has undergone a significant transformation, in no small part to Laura’s online lessons.
My career as an artist has led to my work being featured in Mad magazine (UK), Punch, Daily Mirror, The Times, and FHM. Primarily, I have worked in digital formats, using tools like Photoshop and After Effects for animation. However, after our move from Maidstone to Hastings at the tail end of Covid, our family pet dog, Charlie, passed away. He was a beloved part of our family, and I wanted to commemorate his passing in a tangible way - through paint rather than pixels. So, I made a promise to our children that I would paint a portrait of him in oils, a medium I hadn't touched since I was 16.

Still Life ‘2022 Beginners Oil painting Course, Bill Greenhead, 2022, Oil on Canvas Board.
Naturally, I was apprehensive about picking up the brush again after all these years. What if my skills had diminished? Could I do a portrait of our much loved dog and not look ridiculous? I know all to well, there’s a fine line to be trodden here.
Sensing my reservations, my wife and adult children gifted me an online painting course with Laura for my birthday. I admit, I initially cursed them.
Shortly after, I received all the materials in the post from Laura, and a few weeks later, I began painting online with her guidance. Starting with a still life of two apples and a pear, Laura introduced me to various techniques, including thin to fat painting with oils, using a grid, and blocking out dark to light. Over the course of four weeks, I completed the painting, creating something I didn't think I was capable of. It looked good. I was as surprised as anyone.
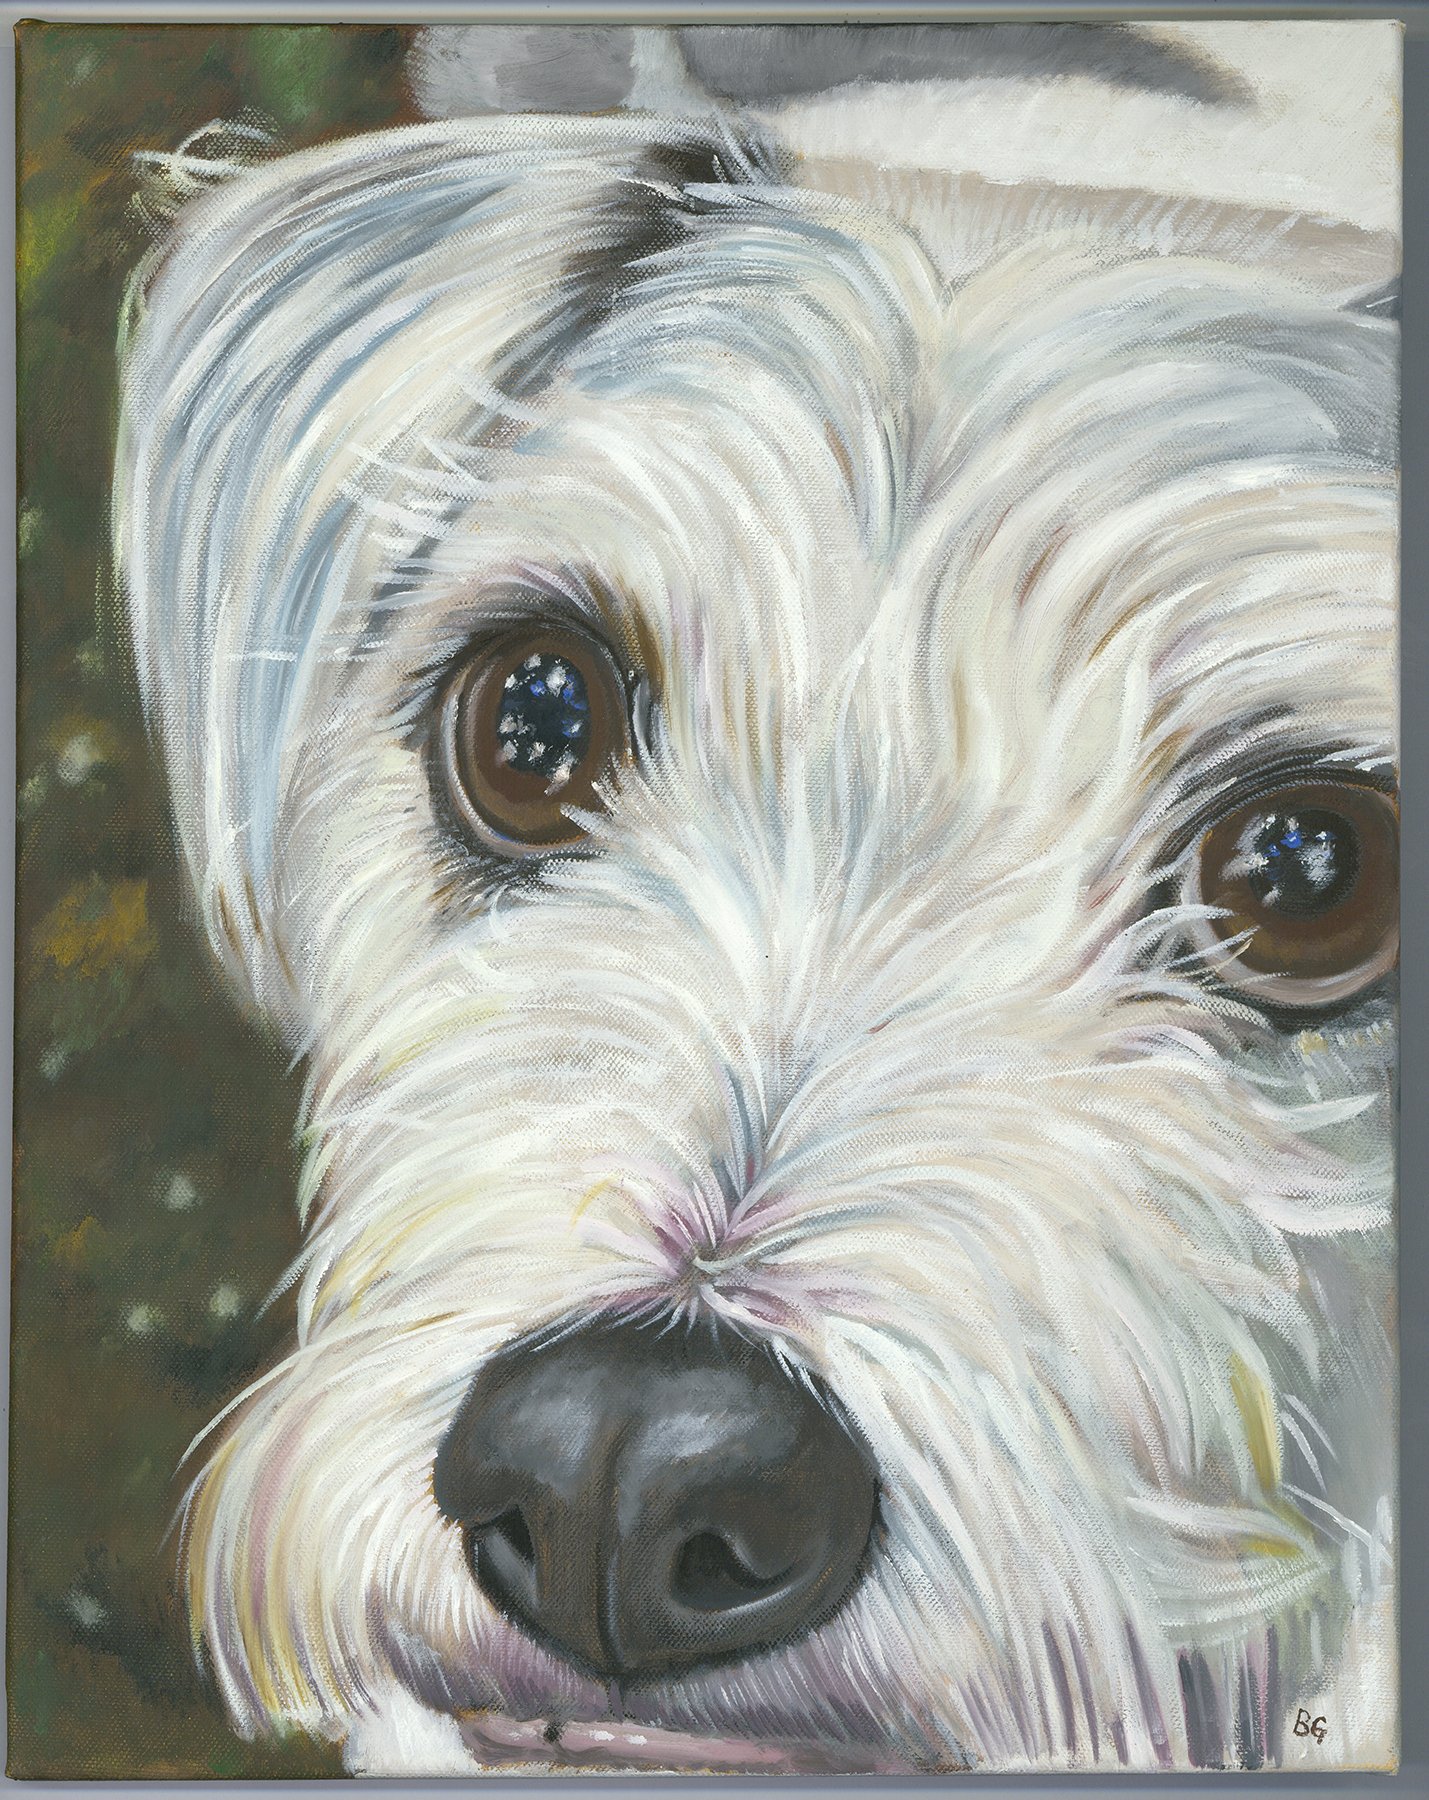
Charlie, Bill Greenhead, 2022, Oil on Canvas
This experience inspired me and gave me the confidence to tackle painting Charlie's portrait. I applied the lessons Laura had taught, gridded it out to get the proportions correct, sketched it all out in burnt Umber, and coloured it up. Blow me, it looked great and the children loved it! What a relief! From there, I immersed myself in painting landscapes of Hastings and St. Leonards, finding inspiration in the dynamic skies and seas of the area. Taking thousands of photos much to my wife's annoyance, 40% of those being seagulls.
Seagulls rule.

Stone Seagull Shadow, Bill Greenhead, 2023, Oil on Canvas
The move to Hastings was also a large reason I needed to paint. You see, I have fallen in love with the sea here. It has inspired me and is a factor in this journey I accidentally found myself on. The seaside fills me with joy and it’s something I feel I need to share.
Looking back on my career, I think it was the fact that I really didn’t feel like I was an artist. If I am honest with myself, I knew I had talent. I am a pretty good cartoonist and can replicate most drawing styles. I have worked in the advertising, publishing space for decades. There was something missing which I couldn’t put my finger on. The craft of generating something you see and converting that image from your mind to a canvas for other people to enjoy hadn’t really occurred to me until I revisited oils. Oil painting wasn’t a job, I wasn’t following a brief, I was creating art to share with the world on my terms. Working with paint, rather than choosing a colour on a digital swatch wheel feels more earned somehow. That’s not to say I am disparaging digital artists. I am one. There is something that feels more like alchemy when you mix and work a colour on a palette. A feeling I was ignorant of, or forgot about until I jumped in and started painting again.
It also informs my digital work. Which is a nice bonus.

Clouds II, Bill Greenhead, 2022, Oil on Canvas
My first paintings have been an exploration of Hastings and the countryside around. I am very interested in learning what the medium can do, and to explore the myriad of colours in the sea and the sky. You see more shades of colour as you continue to paint and therefore see more as you look.
I have taken part in a few exhibitions. It’s been wonderful to meet complete strangers who tell me what they see in my work. I had a lady in tears telling me about how her husband painted landscapes and how my work reminded her of him. It made her very happy. That cannot be bought.

Pier Edge, Bill Greenhead, 2023, Oil on Canvas
Two years later on this journey, I have started to sell my art, with my own exhibitions and prints and greeting cards available in local shops. Now, I am beginning to experiment further, incorporating my love of cartoons and modern art culture into my work. A fun phase if you will. Stemming from the confidence I am beginning to gain from using oils. I have started painting on driftwood and using gold leaf for some work, which I am calling “My Holy Seagull Period”.

Holy Seagull, Bill Greenhead, 2024, Oil on Canvas
I couldn't have embarked on this journey without Laura’s amazing course. She was the perfect teacher, and for that, I thank her from the bottom of my heart.
Bill Greenhead
You can find my work at www.billgreenheadart.com my Instagram is @bill.greenheadart and if you would like to see my animation it’s a www.stikanimation.com or www.funecards.co.uk

Who You Looking At?, Bill Greenhead, 2023, Oil on Canvas

10 Ways to Overcome Artist’s Block & Develop Your Style.
Pop the kettle on and grab a notebook. Here’s a list of 10 ways to overcome Artist’s Block and develop your signature style!

Finding a creative style to get you into that artistic flow can be challenging. With so many different processes, styles, media and tools out there it can be hard to find a starting point. That pause can build up our frustrations. We want to start, but that uncertainty of how to start gives rise to our inner imposter. That voice which tells us ‘Why start on anything, when you aren’t really an artist?’ ‘Why bother when someone else has probably already done the same subject matter?.’
The truth is that styles are not found, they are developed. What makes you unique as an artist, is YOU. You come to the blank page with your own set of unique experiences, history, culture, thoughts and ideas. Draw inspiration from the world around you, whilst expressing your own unique fabulous self.
So put the kettle on, grab a notepad to jot down ideas and enjoy these Top 10 tips on how to overcome a creative artist’s block.
If you find this list useful, we’d LOVE if you shared with us! We can be found on Facebook here, and on Instagram here..
Scroll Down For These 10 steps to overcome artist’s block:
Want to become more playful with your practice? - Experiment.
How to overcome artist block whilst developing your style - Conclusion
1: Remove The Pressure.
It’s okay to not feel creative all the time. 330 million of our cells renew over night, which means you physically not the same person you were yesterday, so give yourself a break. Allow yourself some self-care time to Netflix and chill, do some yoga, go for a walk, read a book, see a friend, or watch the world go by with a cuppa.
Rome was not built in a day and the greatest thinkers of our time have often had break throughs whilst giving themselves some time out. Albert Einstein famously wrote in ‘Seven Brief Lessons on Physics’ “You don’t get anywhere by not ‘wasting’ time.”

Decadent Young Woman After The Dance, Ramon Casas, 1899, oil painting, 46.5 x 56 cm, Courtesy Of: https://www.wikiart.org/en/ramon-casas/68bc12880c76d4e30657d96ffecbbeba-1899/
2: Research Artists.
Go to an Art Gallery, make a Pinterest Board, visit your local library or book shop.
Make a note of Artists work which catches your eye and why. What is it you like about their work? What style do they work in? What’s the subject matter? Are there any memories it reminds you of? Is there a theme which appeals to you?
Use these questions to start to unravel what it is you like from an art work, what it is you want to say and what it is you want to put out into the world.
Artists throughout history have been inspired by what other creatives have done before them. Pop Artist, Roy Lichtenstein famously drew inspiration from Vincent Van Gogh’s 1889 painting ‘Bedroom In Arles’, creating his own unique take on it in 1992 ‘Bedroom at Arles’. As long as you accredit those who came before, there’s nothing wrong with being inspired.
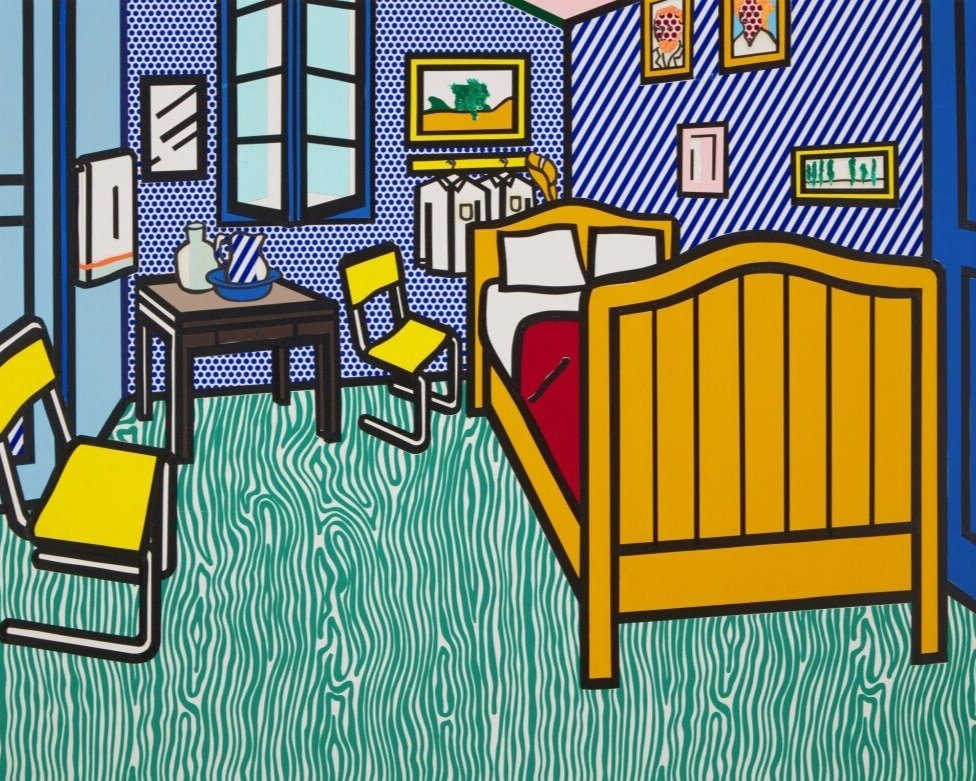
Bedroom At Arles, Roy Lichtenstein, 1992, oil and Magna on canvas, https://en.wikipedia.org/wiki/Bedroom_at_Arles
3: What Makes You, You?
What is it that YOU are interested in? What ideas, theories, ideologies or philosophies are important to you? What hobbies do you enjoy doing? What are the symbols or imagery involved that you can draw inspiration from?
If you’re working with subject matter that you are passionate about you are more likely to want to create something around it.
Somerset based artist, Emma Dibben loves nature, from visiting the coast to growing her own fruit and veg in her allotment. After studying illustration, she started to create studies using her grown produce with Watercolour Paint. Emma has now made her career by illustrating everything from ‘The Waitrose Essential’ Range to Cook Books.
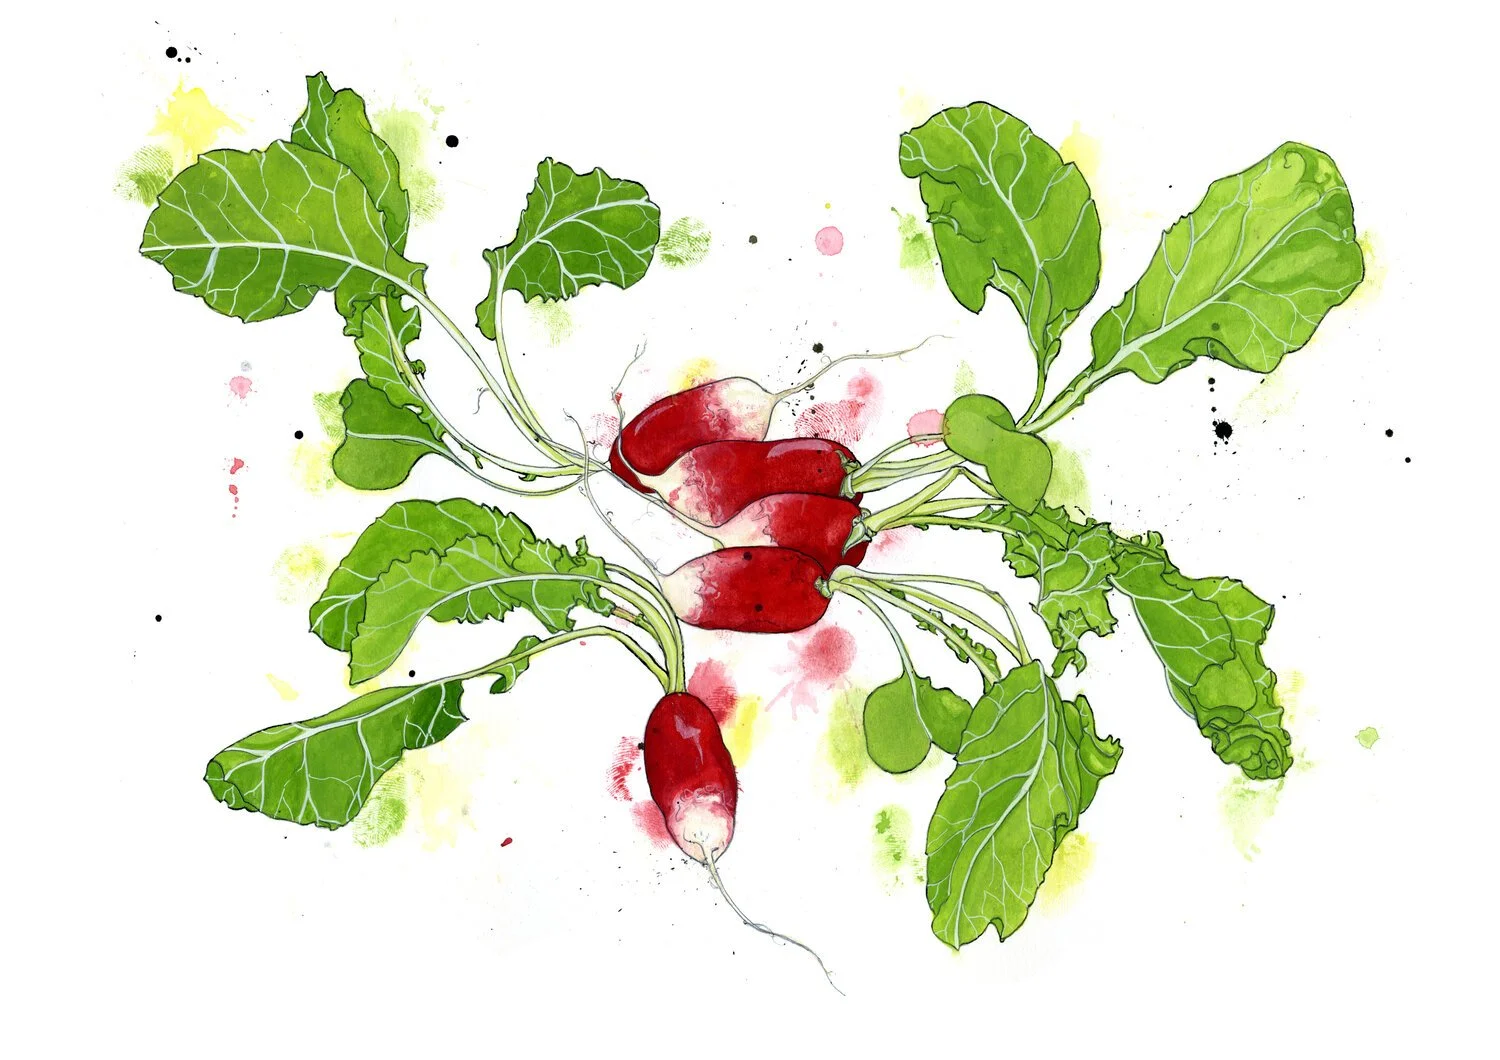
Emma Dibben, https://www.emmadibben.com/
4: Reference Images.
Start taking photos of objects, people (with their permission) or environments which inspire you. Capture a still life with objects which symbolise that thing or idea you’re interested in. Arrange a photoshoot with a model, or go to an event and request permission to take photographs.
You can play around with editing the images on your device or computer - change the colour, increase contrasts, brightness, or add filters until you come up with an image you want to work with.
Famous artists such as: Degas, Picasso, Gaugin, Lautrec, Cezanne, and Van Gogh have all used photographs as reference images for their work. Edgar Degas famously used images from Ballet Classes to create his beautiful paintings.

Edgar Degas, Blue Dancers, 1899, Courtesy of: https://www.wikiart.org/en/edgar-degas/blue-dancers
5: Experiment.
Play with creating work using your reference images in different styles and different media each time. Experiment by cropping into your work, or merging different images together.
Enjoy the freedom to experiment and play without having any expectation of what it will look like as a final piece. This time is for you to explore and enjoy the process.
Throughout history, artists have always kept sketchbooks to experiment with different ideas and create small studies which would later translate into their masterpieces, Frida Kahlo didn’t just write in her diary, she also drew in it, using the drawings later for her iconic paintings.

Frida Kahlo, Diary Pages, https://www.fridakahlo.org/
6: Refine.
Look back through the body of work you have created with experimentation. Which were your favourites? What medium was your favourite way of working?
Using your favourite pieces, sketch out three alternative designs.
Henri Matisse created two still life paintings between 1904 and 1905. The compositions are identical, but the styles are completely different. While the Still Life with Purro I is more classical, the second Still Life with Purro II, is more typical of the style with Matisse became known for.
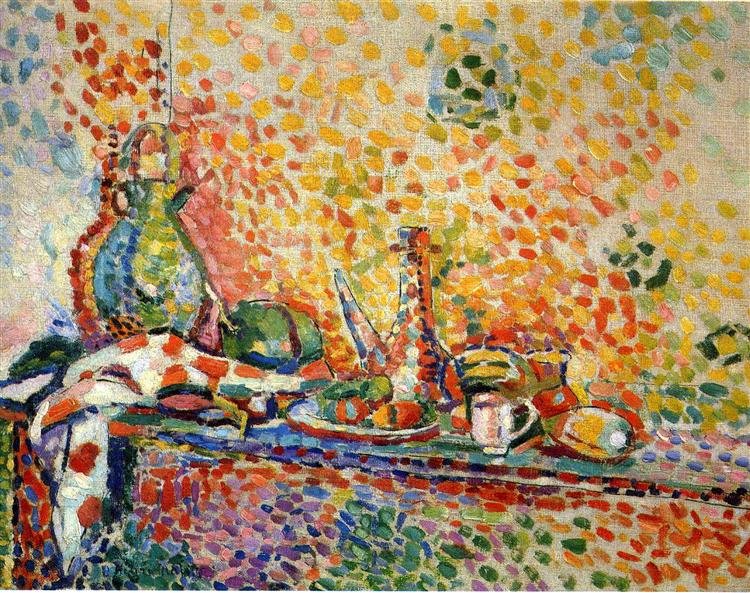
Henri Matisse, Still Life With a Purro (II), 1904 - 1905, https://www.dailyartmagazine.com/5-masterpieces-with-multiple-versions/
7: Create.
Select your favourite design from your refined ideas above and create it on a larger scale! Remember that this is still one part of the process into developing your style - it does not have to be your final piece.
Lucian Freud painted over 5o self-portraits over his lifetime as a way to explore the medium of painting and composition.

Lucian Freud, Reflection (Self-portrait), 1985., Oil on canvas. 55.9 x 55.3 cm. Private Collection. On loan to the Irish Museum of Modern Art, IMMA Collection: Freud Project 2016-2021 © The Lucian Freud Archive / Bridgeman Images..
Courtesy of: https://www.royalacademy.org.uk/exhibition/lucian-freud-self-portraits
8: Self-Assessment.
Back in my days of school teaching, we encouraged students to learn how to self assess and reflect on their work and development.
Start by writing down three things you feel have gone well with your piece. What are the elements of it you like or are proud of? Which bits did you most enjoy doing? Are there any parts you feel you have improved on? Finally, write down two ‘Even Better Ifs’. What do you want to improve upon for next time? What are the areas you think you could change? Is there a different colour palette or alternative composition you would like to try?
Most importantly, don’t be too hard on yourself at this stage. Some days, creativity flows easier than other days as we bring our personal emotions and the days events with us to the canvas. Each work we create is an opportunity to learn and get excited about the next piece.
Despite all of Vincent Van Gogh’s mental health problems and constant peer criticism, over his 10 years as an artist, he created almost 900 paintings, and a further 1,100 works on paper – which means a new artwork every 36 hours (on average). Keep reviewing, exploring, reflecting and assessing - You got this!

Vincent van Gogh, Starry Night, Oil on Canvas, Saint-Rémy, France: June, 1889, The Museum of Modern Art, New York, New York, United States of America, North America.
Courtesy of: https://www.vangoghgallery.com/
9: Peer Review.
Just as important as your own self assessment, ask someone else for their opinion! Variety is the spice of life and the more ideas or thoughts you can collect, the larger your inspiration pool. Ask someone you trust, a fellow artist, or Get In Touch with me. You need not ask for criticism, instead ask them what they like about the piece and what emotions, thoughts or memories it evokes for them. Discover and explore what your work means for others and see if it aligns with your own ideas. Use this as an opportunity to see your work through another’s eyes and remove subjectivity.
Throughout history, artists have aligned themselves to particular groups or movements of like-minded creatives to help inspire each other and review their work. One of the most famous of these groups was The Pre-Rapheelite Brotherhood in the late 19th Century. A group which consisted of English painters, poets and critics, with notable creatives: William Holman Hunt, Dante Gabriel Rossetti, John Evert Millais & later-on William Morris and John William Waterhouse. Their manifesto was:
To have genuine ideas to express;
To study Nature attentively, so as to know how to express them;
To sympathise with what is direct and serious and heartfelt in previous art, to the exclusion of what is conventional and self-parading and learned by rote.
Most indispensable of all, to produce thoroughly good pictures and statues.
Latham, David, Haunted Texts: Studies in Pre-Raphaelitism in Honour of William E. Fredeman, William Evan Fredeman, David Latham, eds, 2003, University of Toronto Press, ISBN 0802036627, 9780802036629, google books. Page 11-12.

John Everett Millais, “Ophelia,” (detail) ca. 1851 (Photo: Google Art Project Public Domain).
Courtesy of: https://mymodernmet.com/pre-raphaelite-brotherhood/
10: Keep Going!
Having completed all the above steps, keep creating. Be open to changing direction and exploring avenues of thought. If none of the above has worked, then attend a local art class so you can remove subjectivity and focus on improving your skillset.
If you look through the work of many of the greats, their style and subject matter changes throughout the years. From Matisse’s wheelchair confinement forcing him to explore collage, to Picasso’s change of direction from traditional paintings leading to co-found The Cubists.
Let your ideas wander and don’t feel confined to any particular thing. Creativity is a true expression of your own unique self through a celebration of you finding creative flow from whatever it is which sparks you joy or intrigue.
At the beginning of every online class, I remind students of the following quote:
”Inspiration exists but it has to find your working.’ - Pablo Picasso

Le Rêve, Pablo Picasso, 1932, oil painting (130 × 97 cm).
Courtesy of: https://www.pablopicasso.org
Conclusion:
These are key steps taught to artists in educational institutions to help broaden horizons and inspire creativity. I hope these pointers help spark imaginations to break through the creative block and get you working. Remember that creativity is not found, it is developed through exploration, experimentation and dedication.
Please don’t forget to email me your work, or tag Brushstrokes Courses via Facebook or Instagram.
Happy creating!
- Laura
Looking to improve your art skills? Join our mailing list! We love helping artists grow and create their own masterpieces.